


Prepare to embark on a culinary escapade as we delve into the enchanting world of homemade Panipuri. From kneading the perfect dough to mastering flavorful fillings and zesty chutneys, join me on a journey to recreate the essence of Indian street food right in your own kitchen.

Ingredients to Make Panipuri at Home:
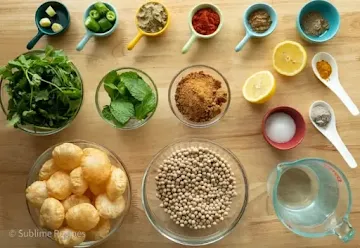
Image courtesy: Sublime Recipes
Before we begin our culinary adventure, let's familiarize ourselves with the essential components of homemade Panipuri:
- Semolina (Sooji/Rava): Provides the base for the crispy puris.
- All-purpose flour (Maida): Adds elasticity to the puri dough.
- Salt: Enhances the flavor of both the dough and the filling.
- Baking soda: Contributes to the light and airy texture of the puris.
- Water: Binds the ingredients together to form the dough.
- Potatoes: Serve as the hearty and savory filling for the Panipuri.
- Green chutney: Adds freshness and a hint of spiciness to the Panipuri.
- Tamarind chutney: Provides a tangy and sweet flavor contrast to the Panipuri.
- Chaat masala: Infuses the dish with a medley of aromatic spices.
- Cumin powder: Adds depth of flavor to the potato filling.
- Chopped onions and coriander leaves: Offer a crunchy and refreshing garnish.
- Oil for frying: Essential for achieving the perfect golden-brown crust on the puris.
5 Easy Steps to Make Panipur at Home
Step 1: Creating the Perfect Puri Dough

Image courtesy: Dassana's veg recipe
The foundation of any great Panipuri lies in the preparation of the puri dough. Follow these steps to achieve dough perfection:
1. In a large mixing bowl, combine 1 cup of semolina, 1 cup of all-purpose flour, a pinch of salt, and 1/4 teaspoon of baking soda.
2. Gradually add water to the dry ingredients, kneading until a stiff dough forms.
3. Cover the dough with a damp cloth and let it rest for 15-20 minutes, allowing the gluten to relax and the flavors to meld.
Step 2: Crafting the Flavorful Potato Filling
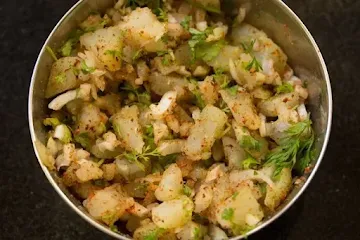
Image courtesy: Dassana's veg recipe
Elevate your Panipuri experience with a delicious and aromatic potato filling:
1. Boil potatoes until tender, then peel and mash them in a bowl.
2. Season the mashed potatoes with salt, chaat masala, cumin powder, chopped onions, and fresh coriander leaves.
3. Mix the ingredients thoroughly to ensure an even distribution of flavors, adjusting the seasoning to taste.
Step 3: Rolling and Frying the Puris to Perfection

Image courtesy: Dassana's veg recipe
Achieving the ideal texture for the Panipuri puris requires precision and patience:
1. After the dough has rested, knead it once more to ensure a smooth consistency.
2. Divide the dough into small, evenly sized balls, then roll each ball into a thin disc using a rolling pin.
3. Heat oil in a deep frying pan over medium heat. Once the oil reaches the correct temperature, carefully slide the rolled puris into the hot oil.
4. Fry the puris until they puff up and turn golden brown, ensuring they are cooked evenly on both sides. Remove the puris from the oil and drain them on paper towels to remove excess oil.
Step 4: Mastering the Art of Assembly
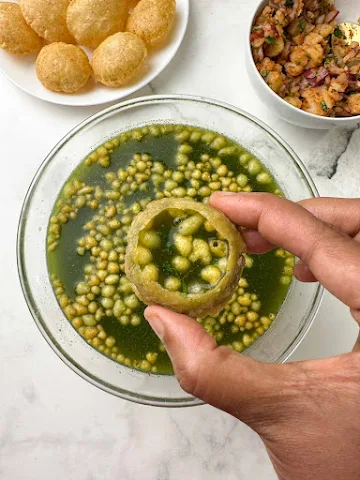
Image courtesy: Indian Veggie Delight
Assembling the Panipuri is where the magic truly happens, as each element comes together to create a symphony of flavors:
1. Gently crack open the top of a puri to create a small opening.
2. Fill the puri with a spoonful of the prepared potato filling, ensuring it is evenly distributed.
3. Add a dollop of green chutney and tamarind chutney to the puri, adjusting the amount according to your taste preferences.
4. Sprinkle a pinch of chaat masala over the filled puri, enhancing its flavor profile with a burst of aromatic spices.
5. Garnish the Panipuri with a handful of chopped onions and fresh coriander leaves, adding a crunchy texture and vibrant color contrast.
Step 5: Preparing Pani Puri Pani:

Image courtesy: spice up the curry
1. Blend together fresh coriander leaves, mint leaves, green chilies, peeled ginger, tamarind pulp, roasted cumin powder, chaat masala, black salt, regular salt, and water.
2. Strain the mixture to remove solids.
3. Adjust the seasoning and consistency to taste.
4. Chill the Pani in the refrigerator.
5. Serve alongside assembled Panipuri and enjoy the refreshing burst of flavors!
Tips and Tricks for Culinary Success:
Unlock the full potential of your homemade Panipuri with these expert tips and tricks:
- Experiment with different proportions of semolina and all-purpose flour to achieve the desired texture for the puri dough.
- Ensure the oil is heated to the correct temperature before frying the puris, as this will prevent them from becoming soggy or greasy.
- Customize the potato filling to suit your taste preferences by adding additional spices, herbs, or vegetables.
Congratulations on mastering the art of homemade Panipuri! By following this comprehensive guide, you have unlocked the secrets to creating an authentic street food experience in your own kitchen. Whether enjoyed as a savory snack or a flavorful appetizer, homemade Panipuri is sure to delight your taste buds and transport you to the bustling streets of India. So, gather your ingredients, roll up your sleeves, and embark on a culinary adventure that promises to tantalize your senses and leave you craving more. Happy cooking, and may every bite of your homemade Panipuri bring joy and satisfaction to you and your loved ones!
Well at last if all these works you will have a great Panipuri at Home Otherwise Lets Order it with magicpin, We will Serve it with Discounts
FAQs Relate To Pani Puri Recipe
Q1. Can I substitute semolina with any other flour for the puris?
Ans: While semolina (sooji/rava) is traditionally used for Panipuri puris, you can experiment with different flours like whole wheat flour or chickpea flour for a healthier twist. However, keep in mind that the texture and taste may vary slightly.
Q2. How can I ensure my puris puffs up properly during frying?
Ans: To achieve perfectly puffed puris, make sure the oil is hot enough before frying. Also, rolling the puris thinly and evenly ensures even cooking and puffing. Additionally, avoid overcrowding the pan, as it can lower the oil temperature and prevent proper puffing.
Q3. Can I prepare the puri dough in advance and store it?
Ans: Yes, you can prepare the puri dough in advance and store it in the refrigerator for up to a day. Just make sure to wrap it tightly in plastic wrap or store it in an airtight container to prevent it from drying out. Allow the dough to come to room temperature before rolling and frying.
Q4. How do I prevent my Panipuri puris from becoming soggy?
Ans: To keep your Panipuri puris crispy, make sure they are fried at the correct temperature and for the right amount of time. Once fried, drain them on paper towels to remove excess oil. Additionally, store the puris in an airtight container once cooled to maintain their crispness.
Q5. Can I customize the potato filling with other ingredients?
Ans: Absolutely! The potato filling for Panipuri can be customized to suit your taste preferences. Feel free to add ingredients like boiled chickpeas, sprouts, diced tomatoes, or even paneer for added flavor and texture. Experiment with different spices and herbs to create your own unique filling recipe.